Getting your store up and running on Unqueue is easy, and it's also a process that we put entirely in your hands. You set up your store using the Unqueue for Business app; once you turn your store on, it will be available to shoppers on both the Unqueue shopper app, and at unqueue.shop.
In this guide, we break down the following steps to take you from app download or web dashboard sign up to switching on your store:
- Getting ready
- Downloading Unqueue for Business App and the Web Dashboard
- Creating your account on App & Web
- Finding your way around on Mobile App & Web
- Unqueue Payouts
- Specifying your operations on App & Web (set hours, pickup and payment)
- Stocking your store on App & Web (adding products)
- Fine-tuning your store App & Web
- Turning on your store
Remember, if you have questions at any point along the way after your account has been created, you can reach out to Unqueue’s support team using the in-app Help button.
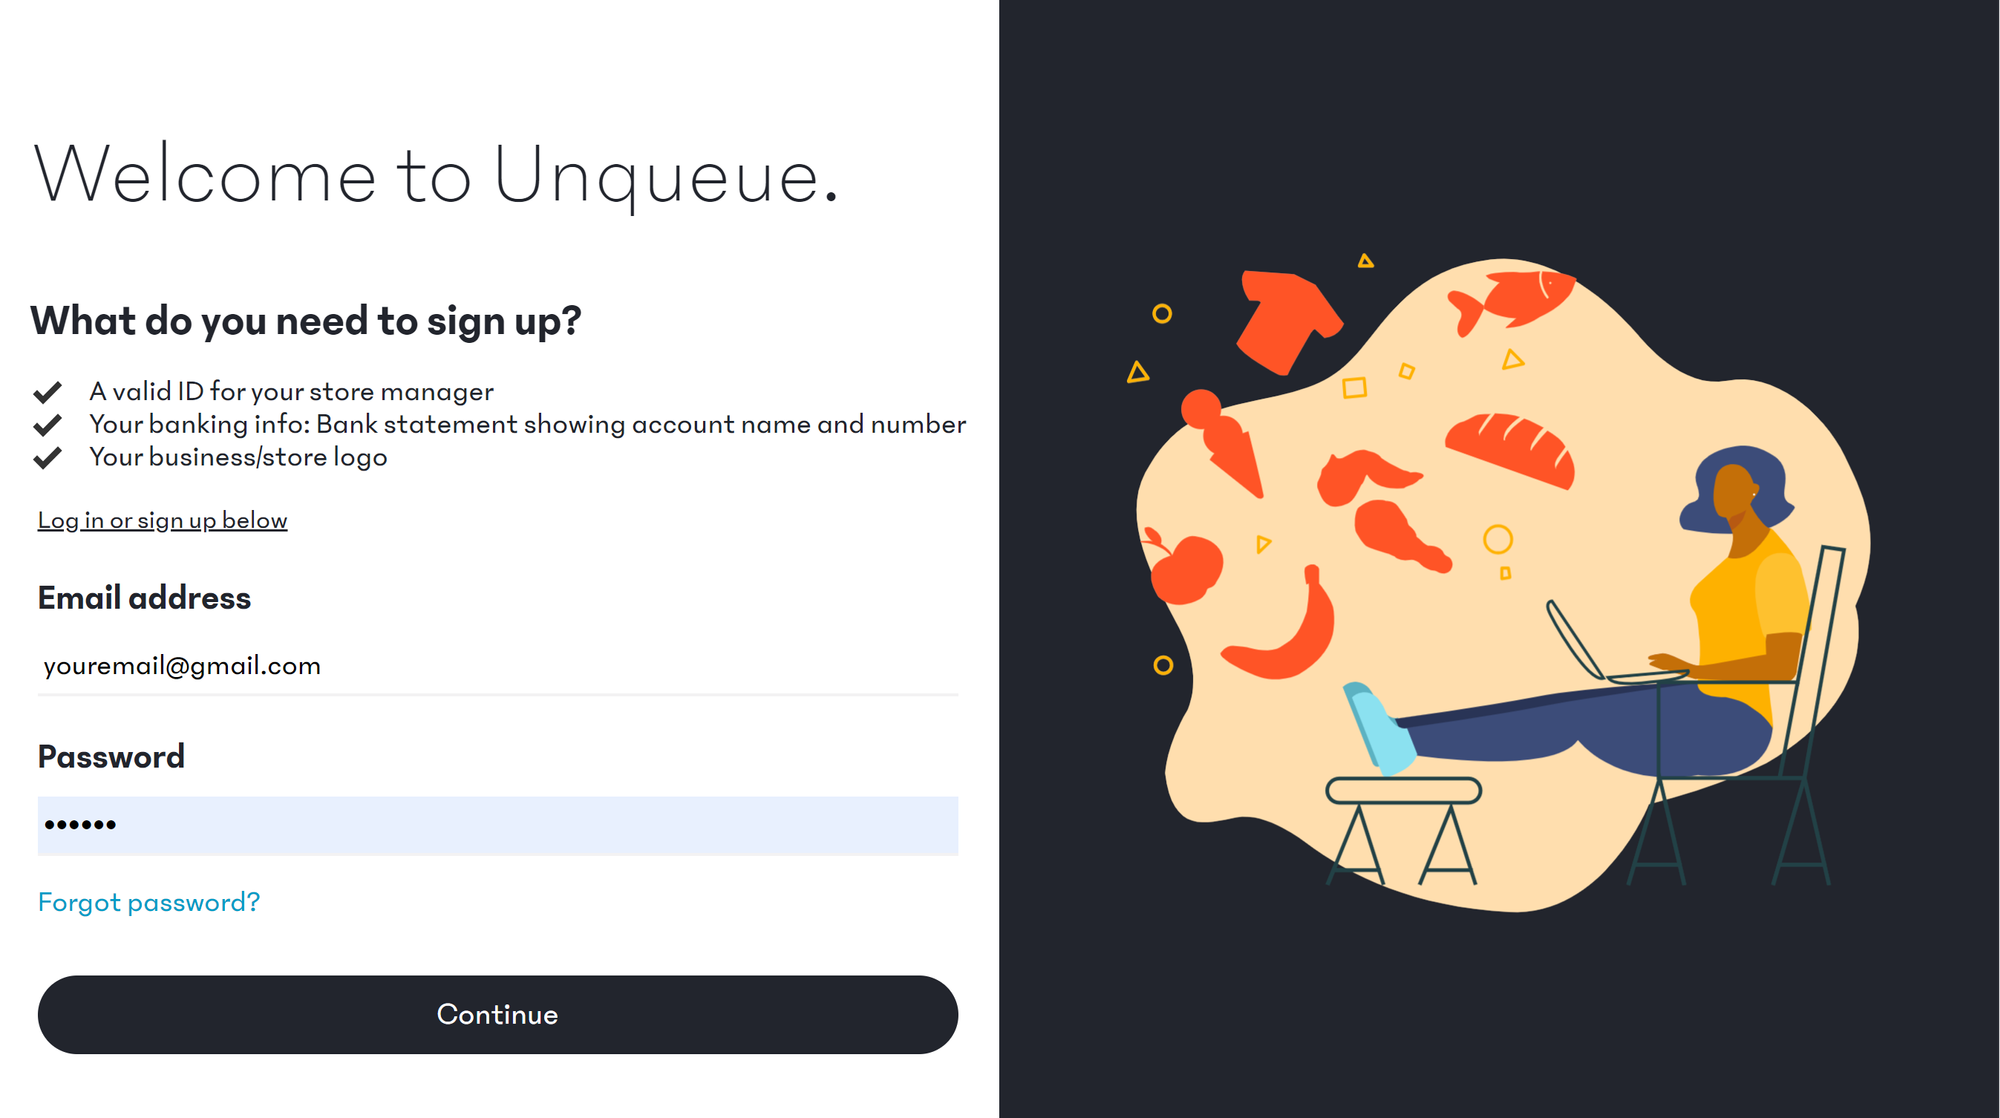
1. Getting ready
Before you get started, here’s a checklist of what you’d need to create your account:
✓ Your store name (as you’d like it to appear on the app)
✓ Your business/store logo
✓ Your mobile phone number (this is the number where you’ll get notifications etc)
✓ Your business’s street address
✓ A valid ID* (this is so we can verify that you are who you say you are)
✓ A header image* of product/s available in your store
✓ Your banking info to sign up for Unqueue Payouts: Name of account holder, bank, bank account number, and part of your statement* that shows owner and number for verification purposes. This does not need to be a business bank account
You can either upload an image or take a photo of this item with your phone as you are completing sign up.
Ready? Let's go!
2. Downloading the Unqueue for Business app and the Web Dashboard
Download and install the Unqueue for Business* app from your regular app source: App Store (Apple) or Google Play (Android).
- There are three Unqueue apps; be sure that you download the business app. It's the one with the blue icon.
To access the web dashboard click and bookmark the weblink here: https://dashboard.unqueue.app/
3. Creating your account on App & Web
Creating your account on App
Once it's been installed, open the Unqueue for Business app and follow the simple prompts to create your account.
Creating your account on Web
You can also create your account using the Unqueue Web Dashboard and follow the prompts to create your account.
You will be asked to type or upload your store name, logo, mobile phone number, business address, a valid ID, header image, and banking info.
You will also be asked to verify your email address*. Didn't get an email? Check your spam folder, especially if you're using Yahoo Mail, which always seems to put us there!* Note that, while you can continue on to build your store, you will not be able to turn it on until your email address has been verified.
4. Finding your way around on Mobile App & Web
Once you've created your account, have a look around! Everything you need to do to set up your store or adjust your store operations falls under one of two control centres on the Unqueue for Business app: the main menu and the navigation bar. Let's explore!
Main menu on Mobile App & Web
The main menu can be accessed at any time by tapping the three dots top right of the app.
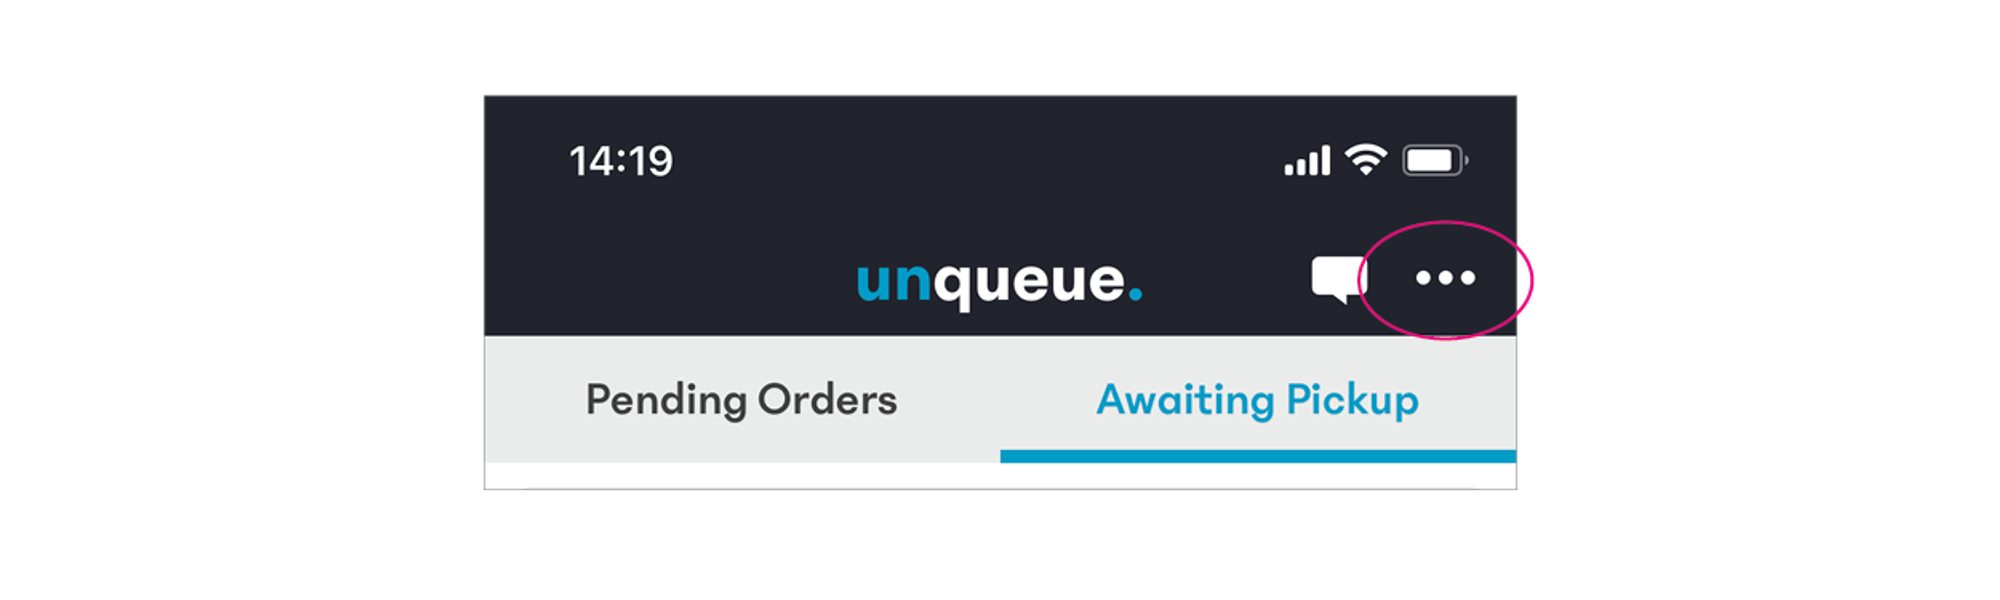
This menu contains the features you need to customise your store and your operations. Tap the dots to open the menu. Tap the X to close it. Here’s what you can find in this menu:
- Store Visible - Turn your store off and on
- 👤 User Account - Find/adjust your business details like name, logo, and contact
- ⚙️ Operations - Set or adjust your operating hours, pickup methods, and pre-order preferences
- 💳 Payment Methods - Set how you'd like to receive payments: Cash, LINX, or online
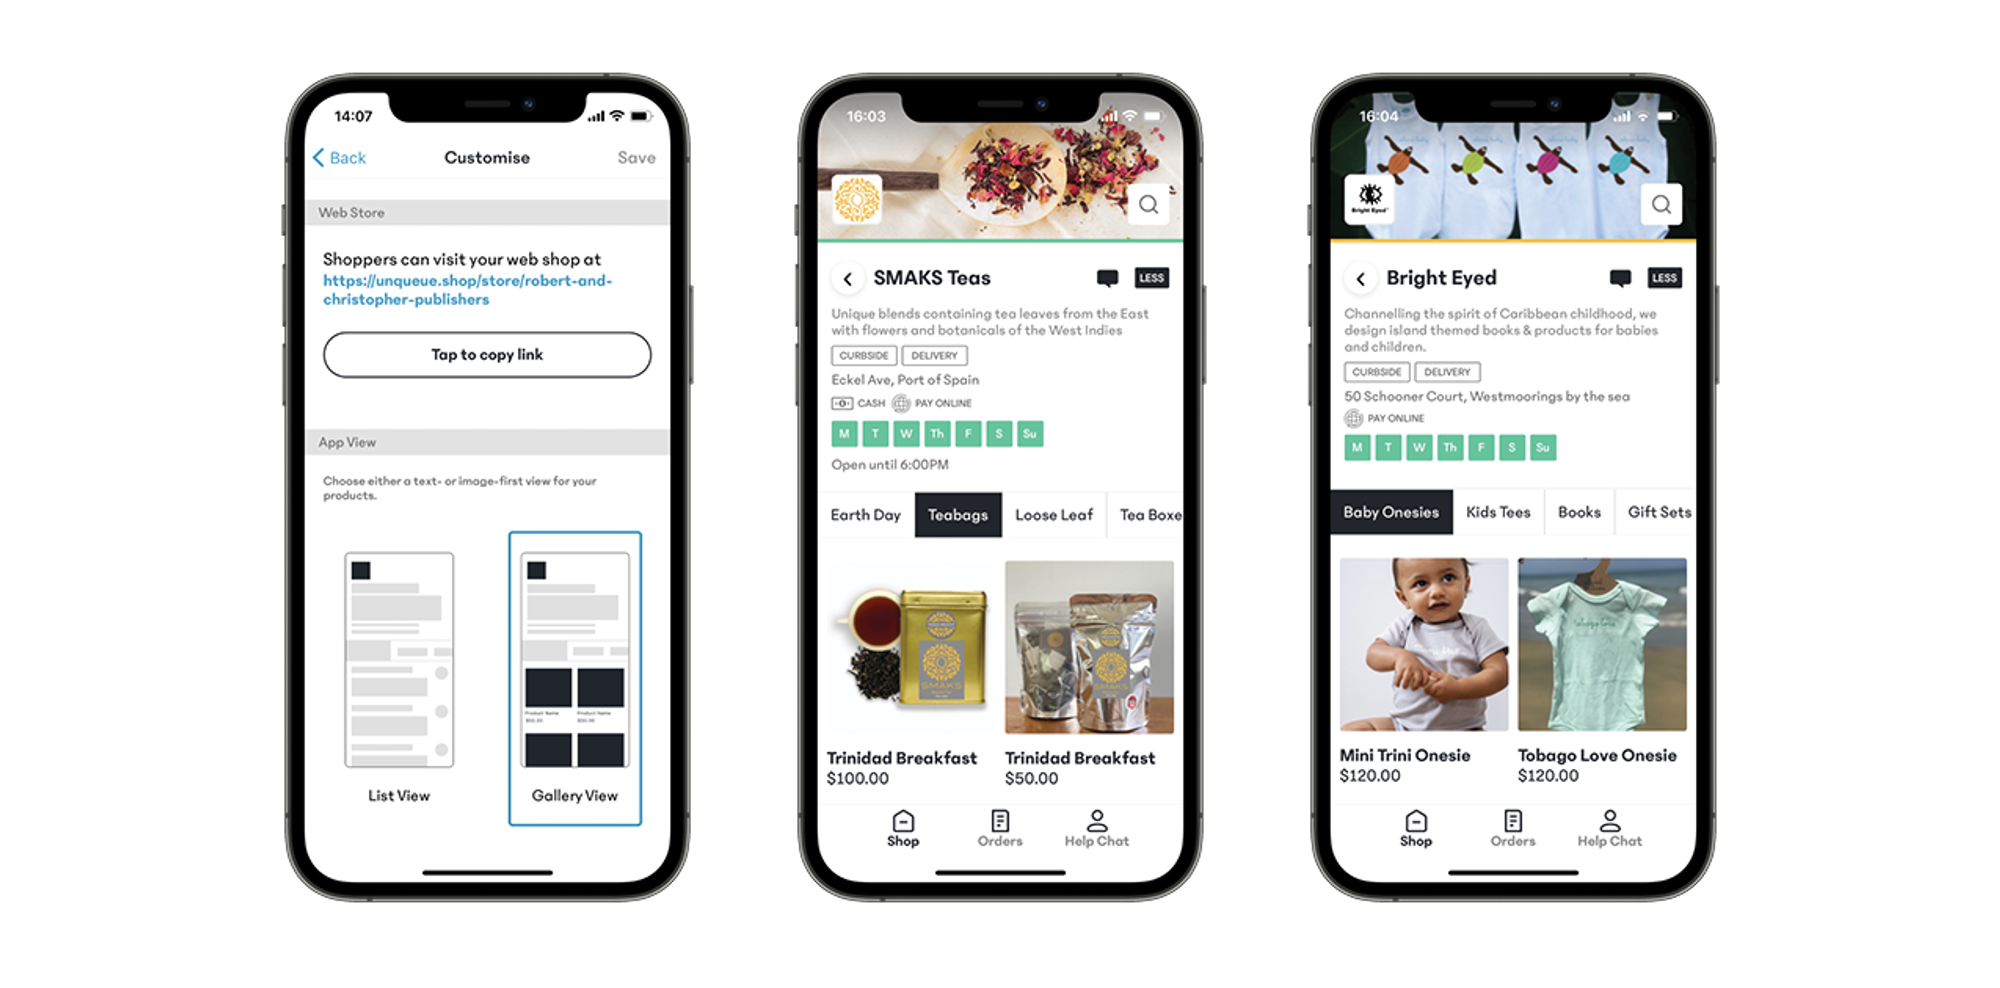
- 🖋️ Customise - Upload a header image, set your store view, and copy your store link
- 🧩 Add-ons - Find our Delivery Add-on here to sign up to our network
- 🛡️ Saved Cards - Set your primary card or add a card to your account
- 💯 Discounts - Set a storewide discount
- 🚗 Delivery - Signed up for Unqueue Delivery? Set your delivery days and times
- 📍 Pick-up Address - Set your pickup address and pin your correct location
- 📜 Order History - A summary of all of your past orders
- 📈 View Current Report - See details of this month's completed orders
Main Menu on Web
- 👤About your business - Enter your business name, store description, mailing address and contact number
- 💳Banking Information - To receive payments you need to enter your banking details such as Bank Name, Name of Account Holder, Upload your ID, Upload your bank statement - this is to verify your bank account.
- 📝 Define your store - Select the up to three (3) categories that describe your business
- ⚙️Operations - Set or adjust your operating hours, pickup methods, and pre-order preferences
- 🚗Set up Delivery - Signed up for Unqueue Delivery? Set your delivery days and times
- 🖋️Customise you Store Upload your logo, and header photo
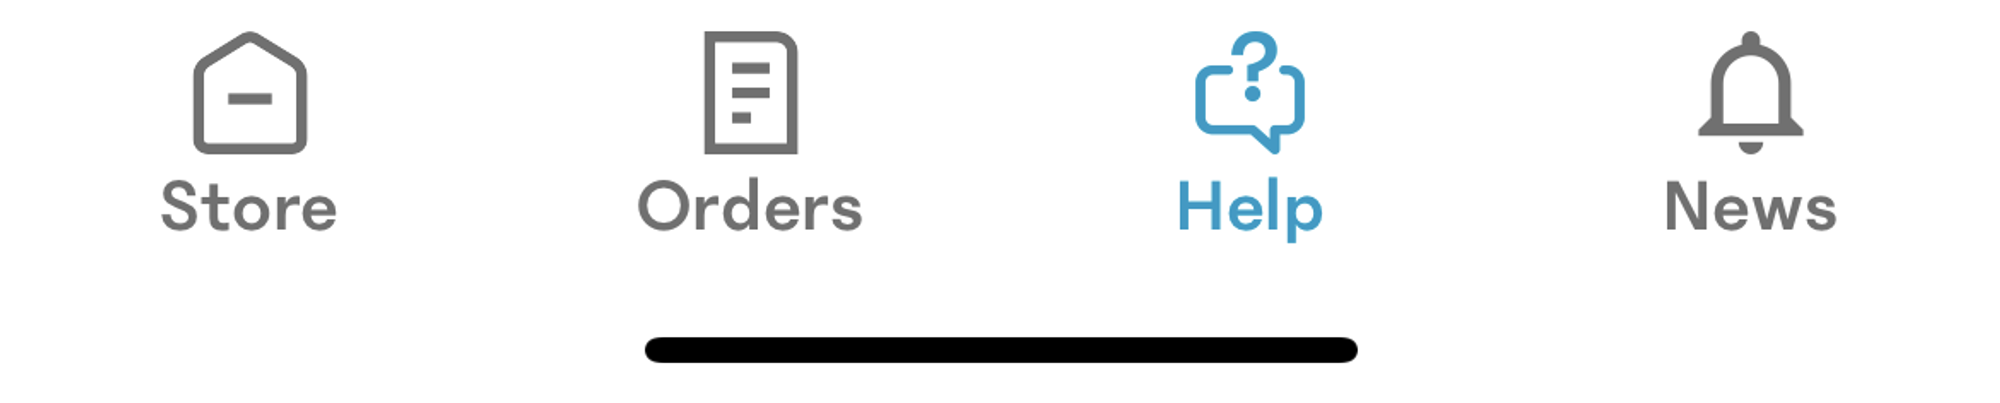
Navigation bar on Mobile App
The navigation bar can be found on the bottom of your Unqueue for Business screen.
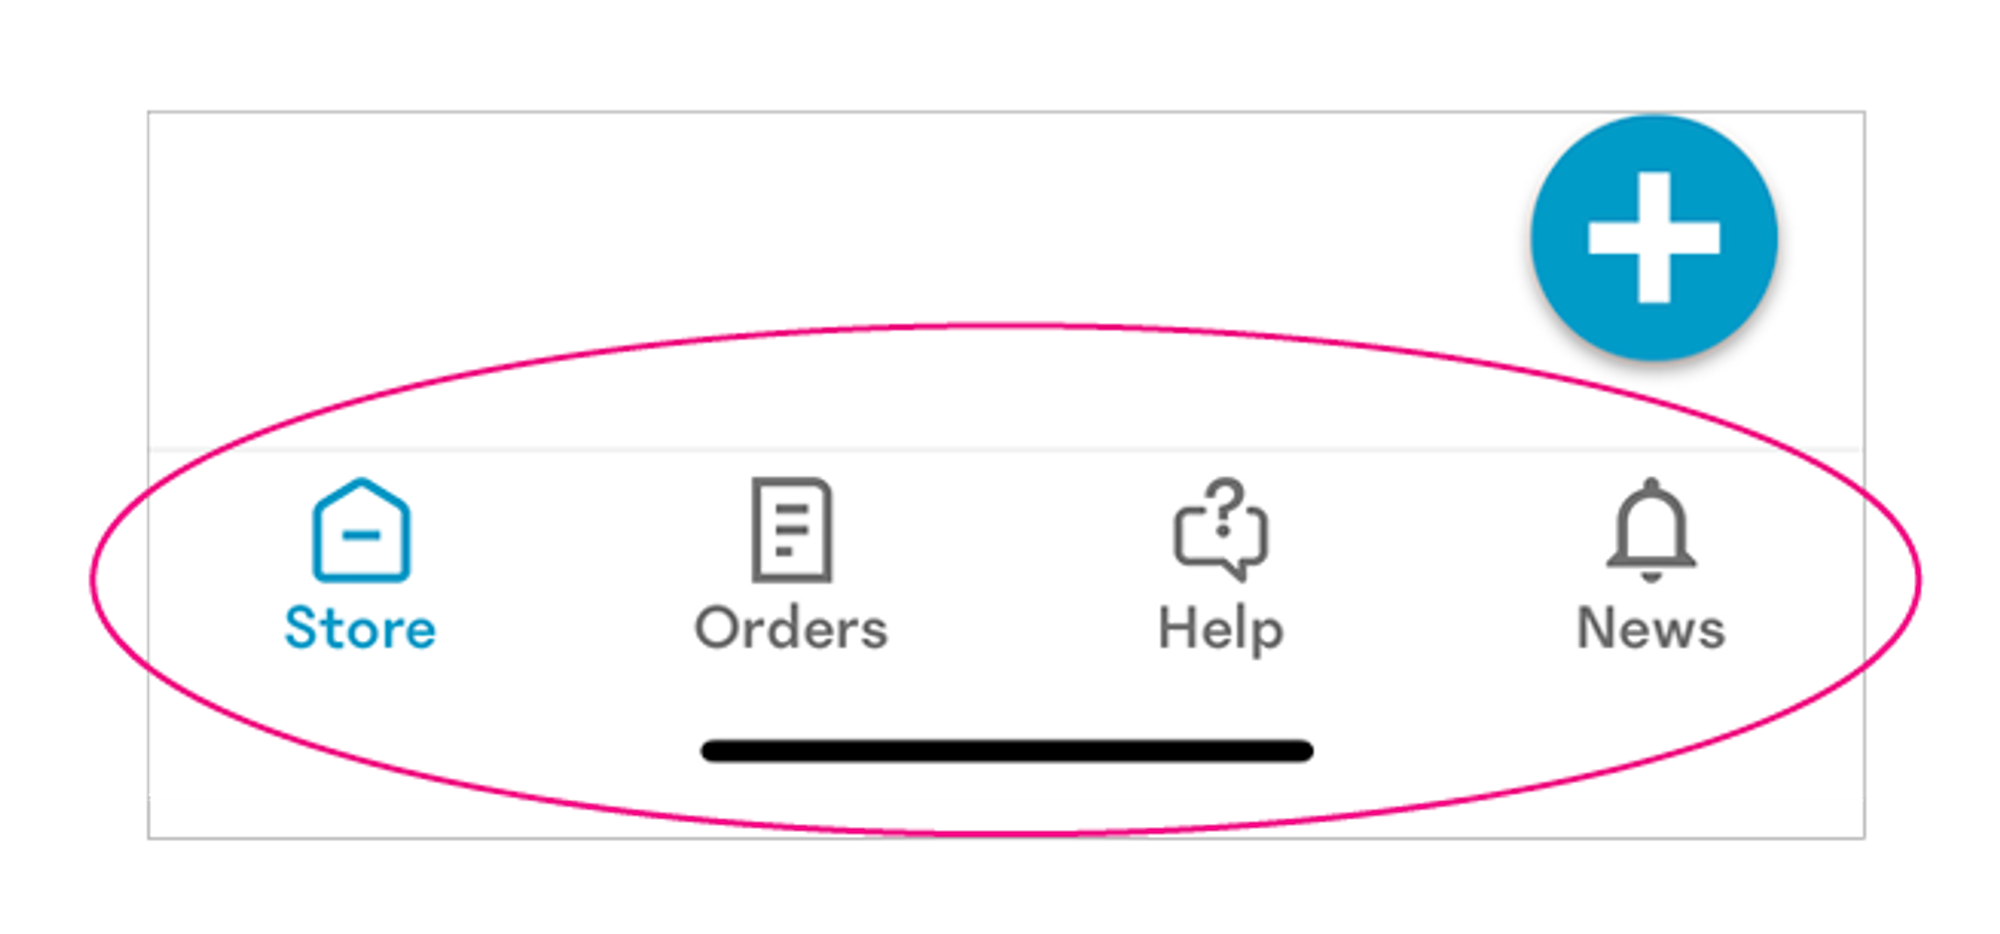
This is where you keep your products current, process orders, get our help if you need it, and where we'll keep you up to date with what we're doing. Here’s what you can find in the navigation bar:
- Store - Add categories and products
- Orders - Access your in-progress orders
- Help - Chat with Unqueue’s support team (M–F, 9am–6pm)
- News - Get updates and information on Unqueue’s latest features
Navigation Bar on Web
- Inventory - Create a category and add a product
- Product Variations - Add variations to your products
- Delivery and Pickup - Set your days and times for delivery
- Operations - To go back to the main menu
- Reports - See details of this month's completed orders
- Users - Coming Soon - currently only available in App
- Inbox - Coming Soon - currently only available in App
- News - Get updates and information on Unqueue’s latest features (Coming Soon - currently only available in App)
Finding your way around the web dashboard walkthrough
Now that you've explored the app and web, let's talk money....
5. Unqueue Payouts
Accepting online payments/ Unqueue Payouts
Unqueue Payouts is our system for accepting online payments made by your shoppers. When shoppers pay for an item with a credit or debit card through the app, we collect that money and then transfer it directly, minus fees, into the bank account you specified on signing up for Payouts. Being able to offer online payments to your shoppers is mandatory on the Unqueue platform, and you won’t be able to turn on your store until you’ve been verified for Unqueue Payouts.
Once you’ve submitted your documents through the app, verification typically takes a few hours. During this time, you can continue building your store.
Got it? Great! Let's get your store set up.
.jpg?table=block&id=25008ee0-61bd-4ca2-b4ea-9287077b46d0&cache=v2)
6. Specifying your operations on App & Web⚙️
With Unqueue, you can be open for business whenever you want, and we also give you the option of accepting orders from shoppers when you are closed.
Adjusting your opening hours on App
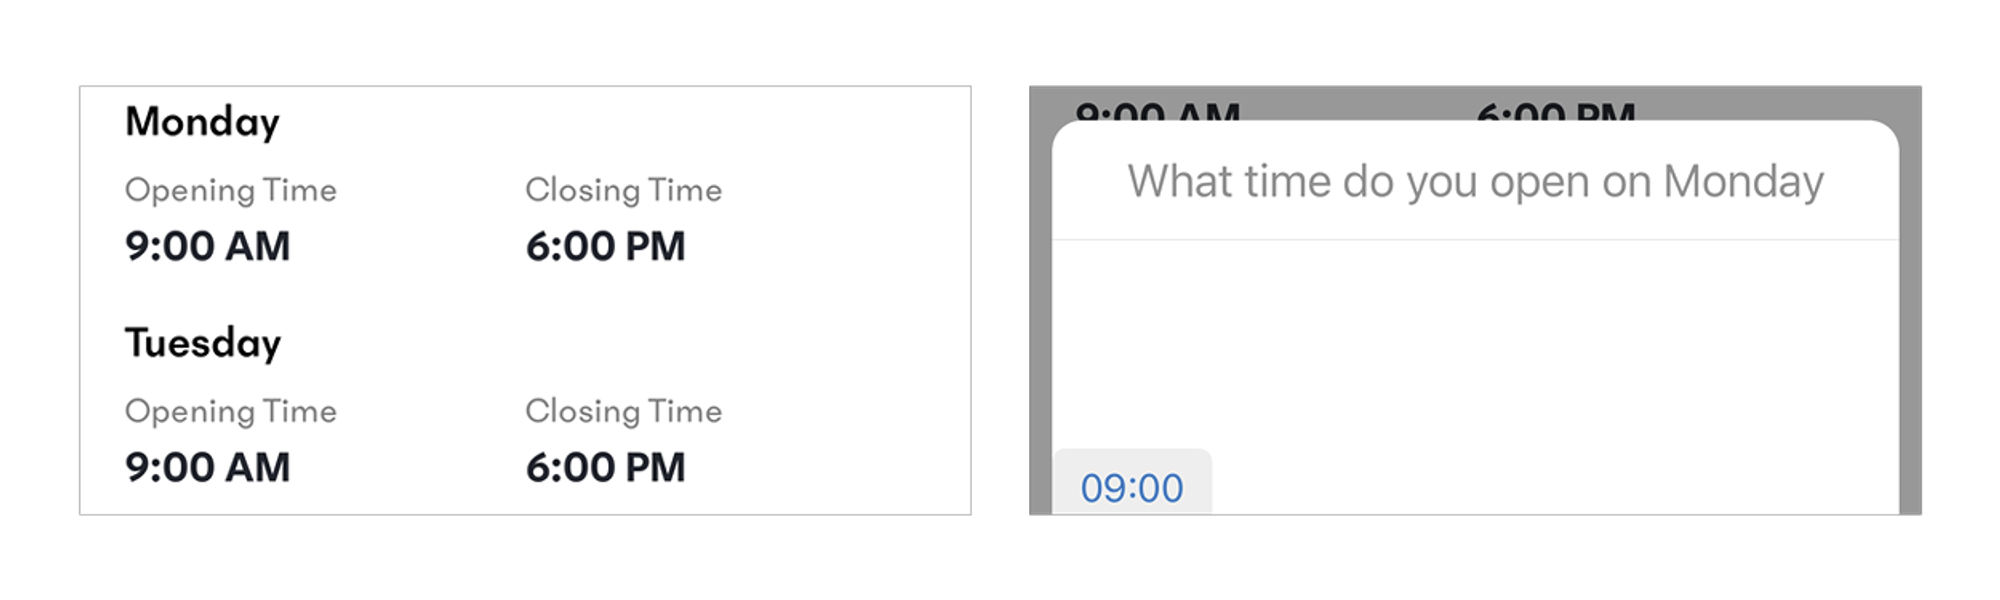
To adjust your store’s opening days and times, head to Operations in the main menu. Opening Hours is at the top, and the first section under it is Opening Days. Tap a day to turn it green. This means that your store is open on that day. Tap again and you’ll get a white box – this means you are closed on that day.
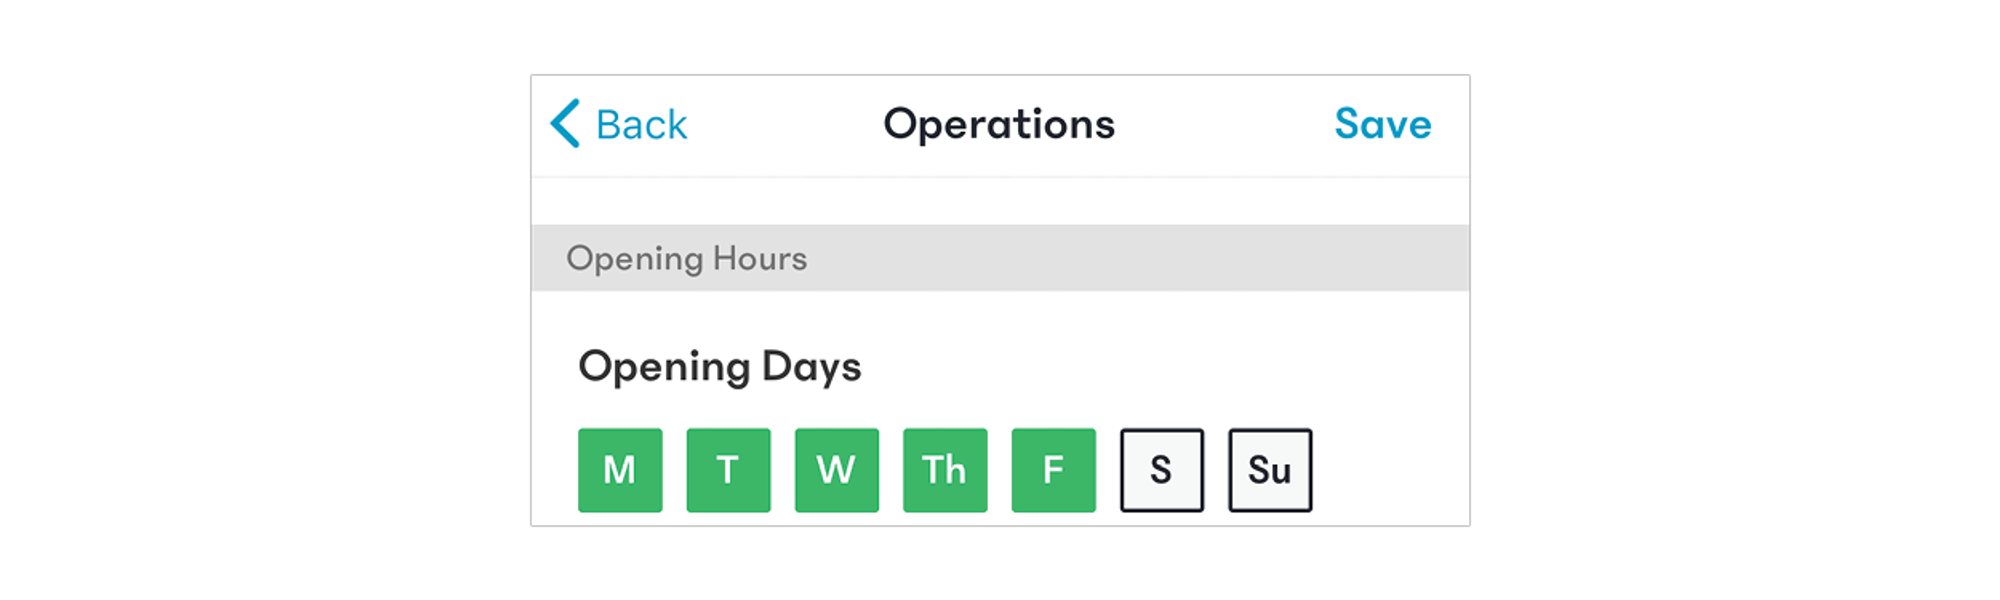
Once a day is green, indicating you are open for business, Opening Time and Closing Time will appear for that day. Tap the time and scroll up or down to adjust. Remember to save!
Adjusting your opening hours on App
Allowing pre-orders
Good news: Unqueue lets you accept orders from shoppers even when your store is closed, which means that you can earn in your sleep. If you’d like to accept orders outside of your opening hours (2am? yes!), then tap the Allow pre-orders checkbox.
If you do not wish to accept orders outside of your store’s opening hours, uncheck the Allow pre-orders box. This means that shoppers will have to wait until you are open again to place an order.
Here's how shoppers know at a glance if you're open or closed:
- Green dot - Your store appears with a green dot within your opening hours
- Amber dot - Your store appears with an amber dot if it’s outside of your opening hours and you are allowing pre-orders
- Red dot - Your store appears with a red dot if it’s outside of your opening hours but you are not allowing pre-orders

- We recommend downloading the Unqueue shoppers app so you can see your store from the perspective of your shoppers.
Adjusting your opening hours on Web
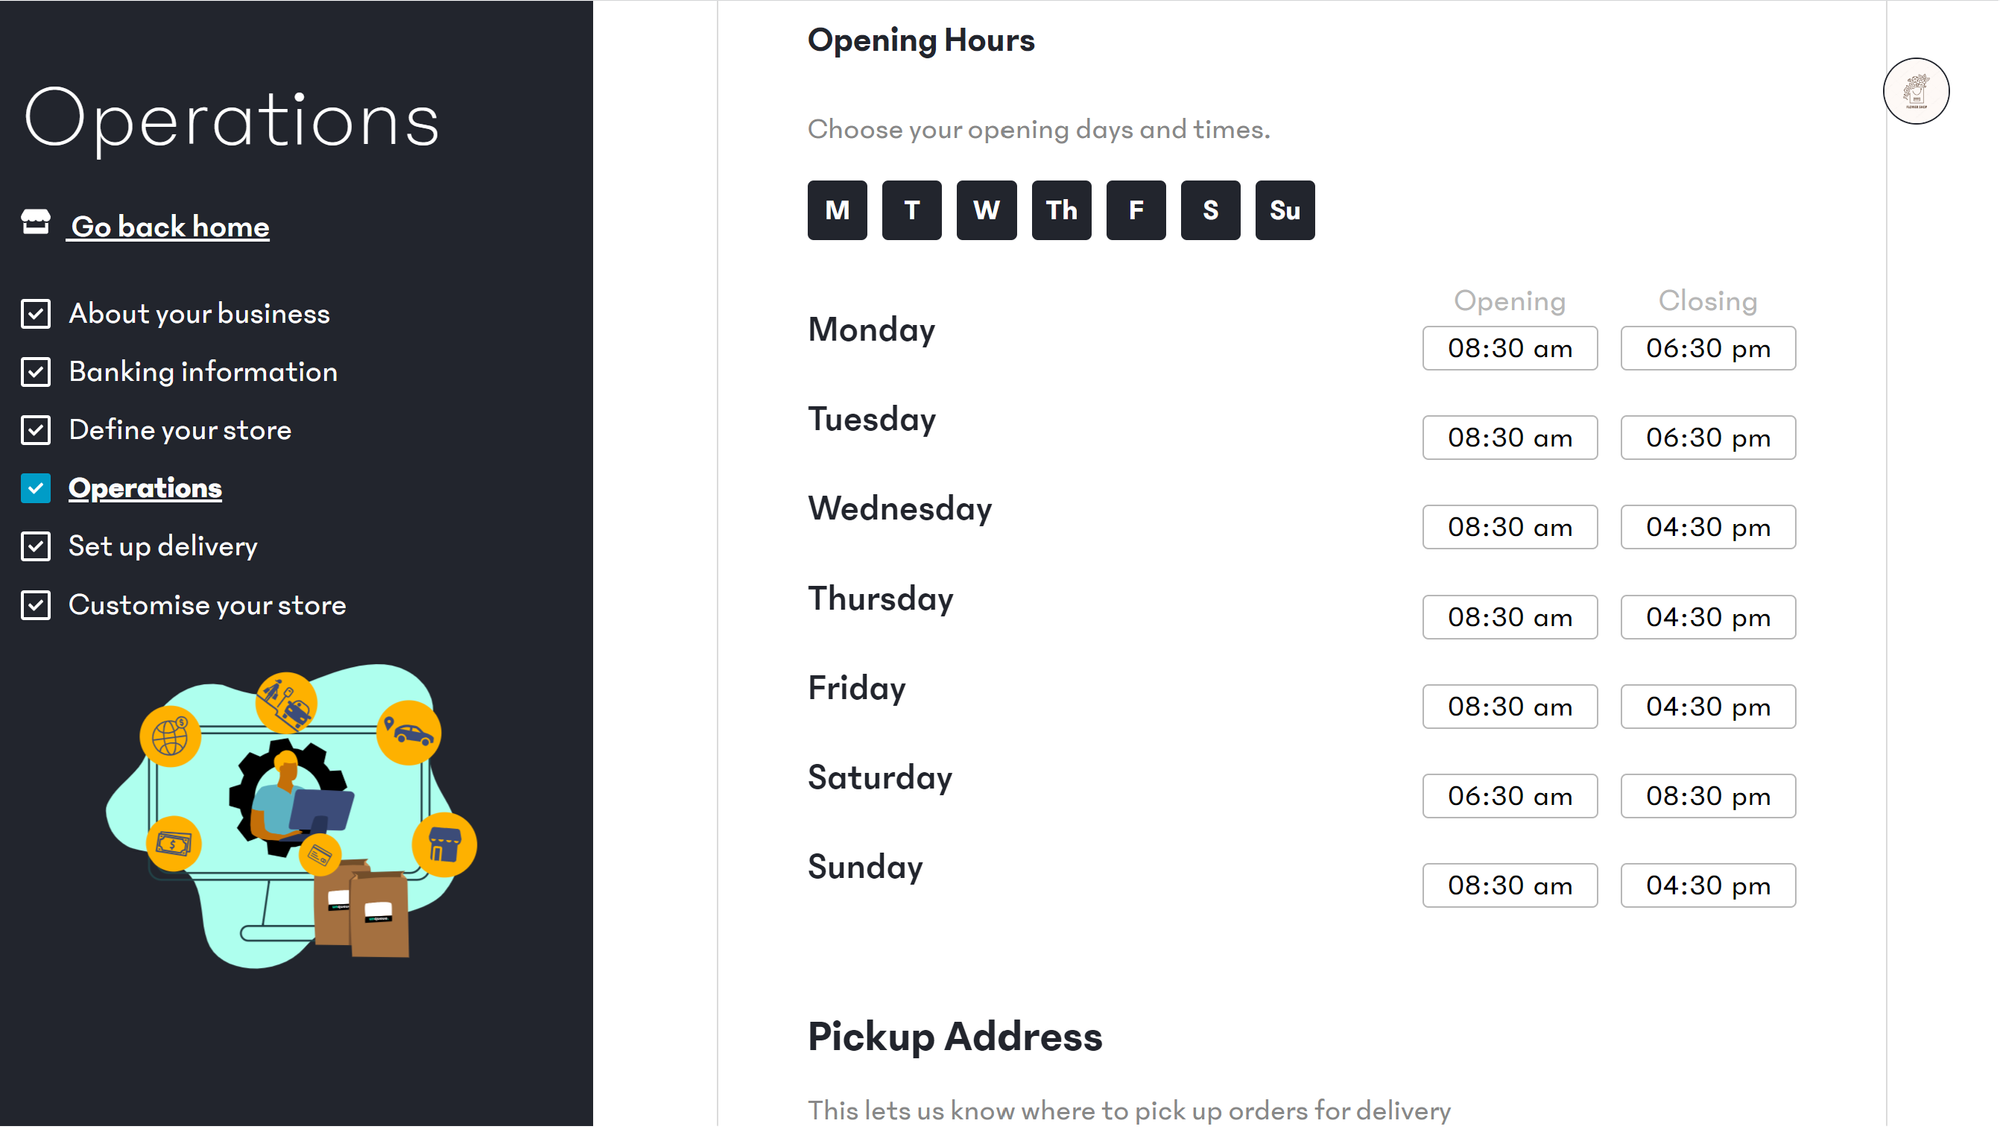
Here's how to adjust your opening hours on Web
- Go to the Main Menu on the web dashboard
- Click operations
- Under Opening Hours choose your opening days and hours
- Click Save
Pickup methods on App
You’ll find the Pickup Methods section under Operations. This is where you determine how you’d like shoppers to collect their orders from you:
- In-store pickup- Shoppers enter your store to collect their order
- Curbside pickup - You take your shopper’s order to them outside of your store
If you select curbside pickup, we make it very easy for you to identify your shopper by providing the make, model, and colour of their car, as well as their exact location outside. Check or uncheck these two options to change your preferences.
.jpg?table=block&id=c372d93e-07d8-4033-99ff-d2c4f45be9f4&cache=v2)
Pickup methods on Web
Here's how to adjust pickup methods on Web
- Go to the main menu on the web dashboard
- Click operations
- Under Fulfillment category you can toggle the various pickup methods - Curbside, In store or Unqueue Delivery
- Click Save
💳 Specifying your payment methods on App
The Payment Methods section can be found under Operations in the main menu of the Unqueue for Business app.
Online Payments is the first section under Payment Methods. If you skipped it while creating your store, this is where you can sign up for Unqueue Payouts – our online payment system that gives you and your shoppers the convenience of in-app credit or VISA Debit card payments. Follow the prompts to enter your financial details. You will receive an email once you’ve been verified.
You can also specify or change the minimum order amount you'd like to accept for online payments.
.png?table=block&id=7ac1692f-64a7-4cbc-8e50-a2a70275661d&cache=v2)
Physical Payments, also known as in-person payments, are also available to you and your shopper. Check or uncheck Cash, Debit/LINX*: Fixed, or Debit/LINX: Portable to adjust your in-person payment methods.

- LINX payments require you to have your own machine. Furthermore, you must have a portable LINX machine if you’d like to offer LINX payments on curbside pickup orders.
💳 Specifying your payment methods on Web
Here's how to specify your payment methods on Web:
- Go the main menu on the web dashboard
- Click operations
- Under Payment Methods category you can select cash, debit/linx (fixed), debit/linx (portable) and Credit Card/Online
- Click Save
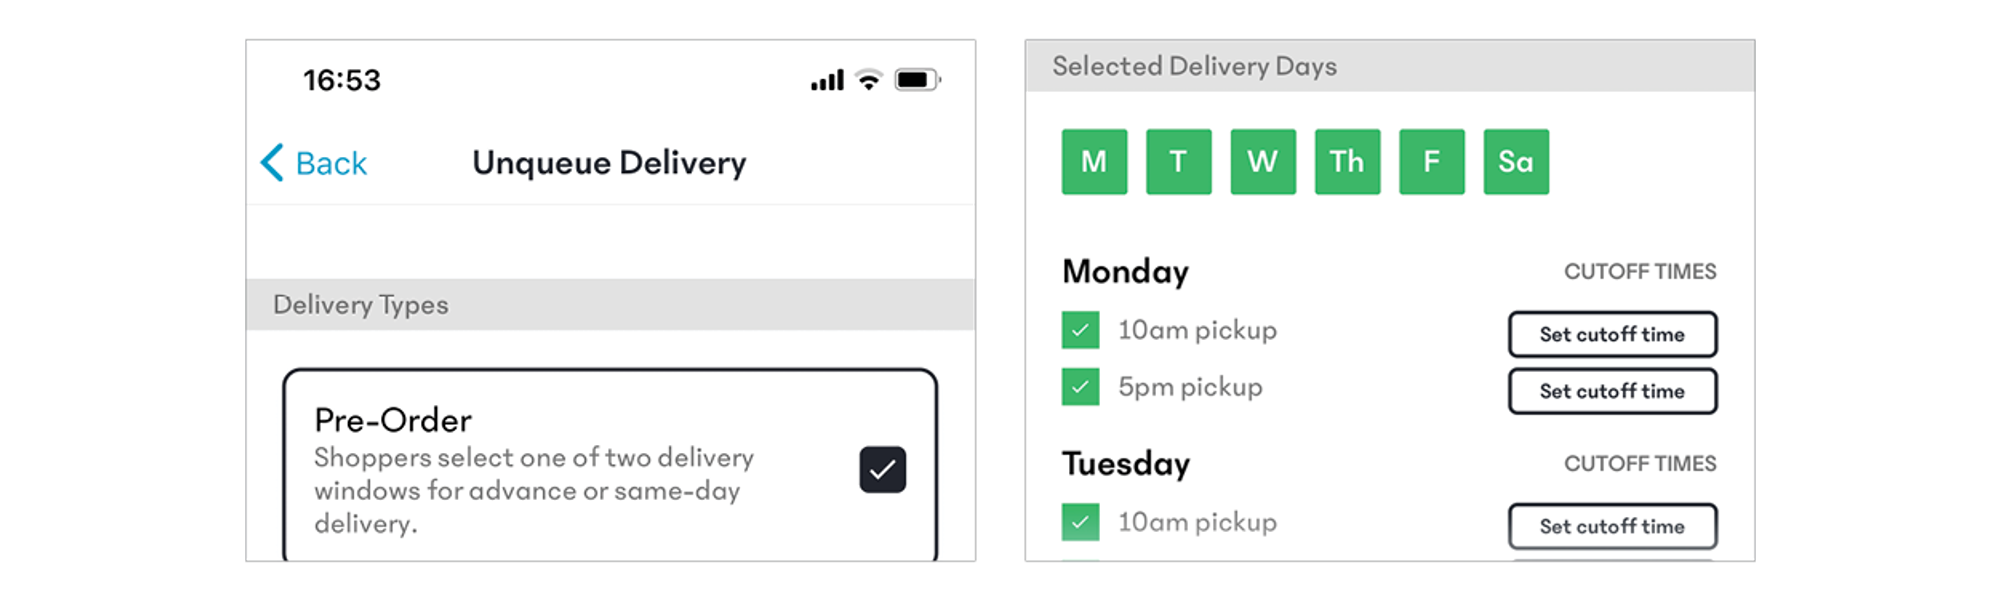
Delivery Set up on App Delivery orders account for roughly 80% of the orders processed through Unqueue. If you’d like to offer your shoppers and yourself the convenience of delivery of your goods to anywhere in Trinidad, you can set up your store for Unqueue Delivery
To set up your delivery, head to the main menu. Tap Delivery.
There, you’ll be able to get an overview of Unqueue Delivery, including scheduling, preparing orders for pickup, fees, and how you get paid for cash and credit card delivery orders processed through the app. Once you’ve reviewed, you’ll be prompted to select the days and windows you’d like to offer delivery.
To learn How to use Delivery on Mobile and Web click Here: How to Use Unqueue Delivery
Your store framework is done – time to add your products!
7. Stocking your store/Building your store inventory on App & Web
Your Unqueue store is made up of categories, within which are your products. Once you’ve created your account, you will receive an in-app prompt to create your first category and add your products. If you missed this, don’t worry – you can add categories and products at any time using one of two methods.
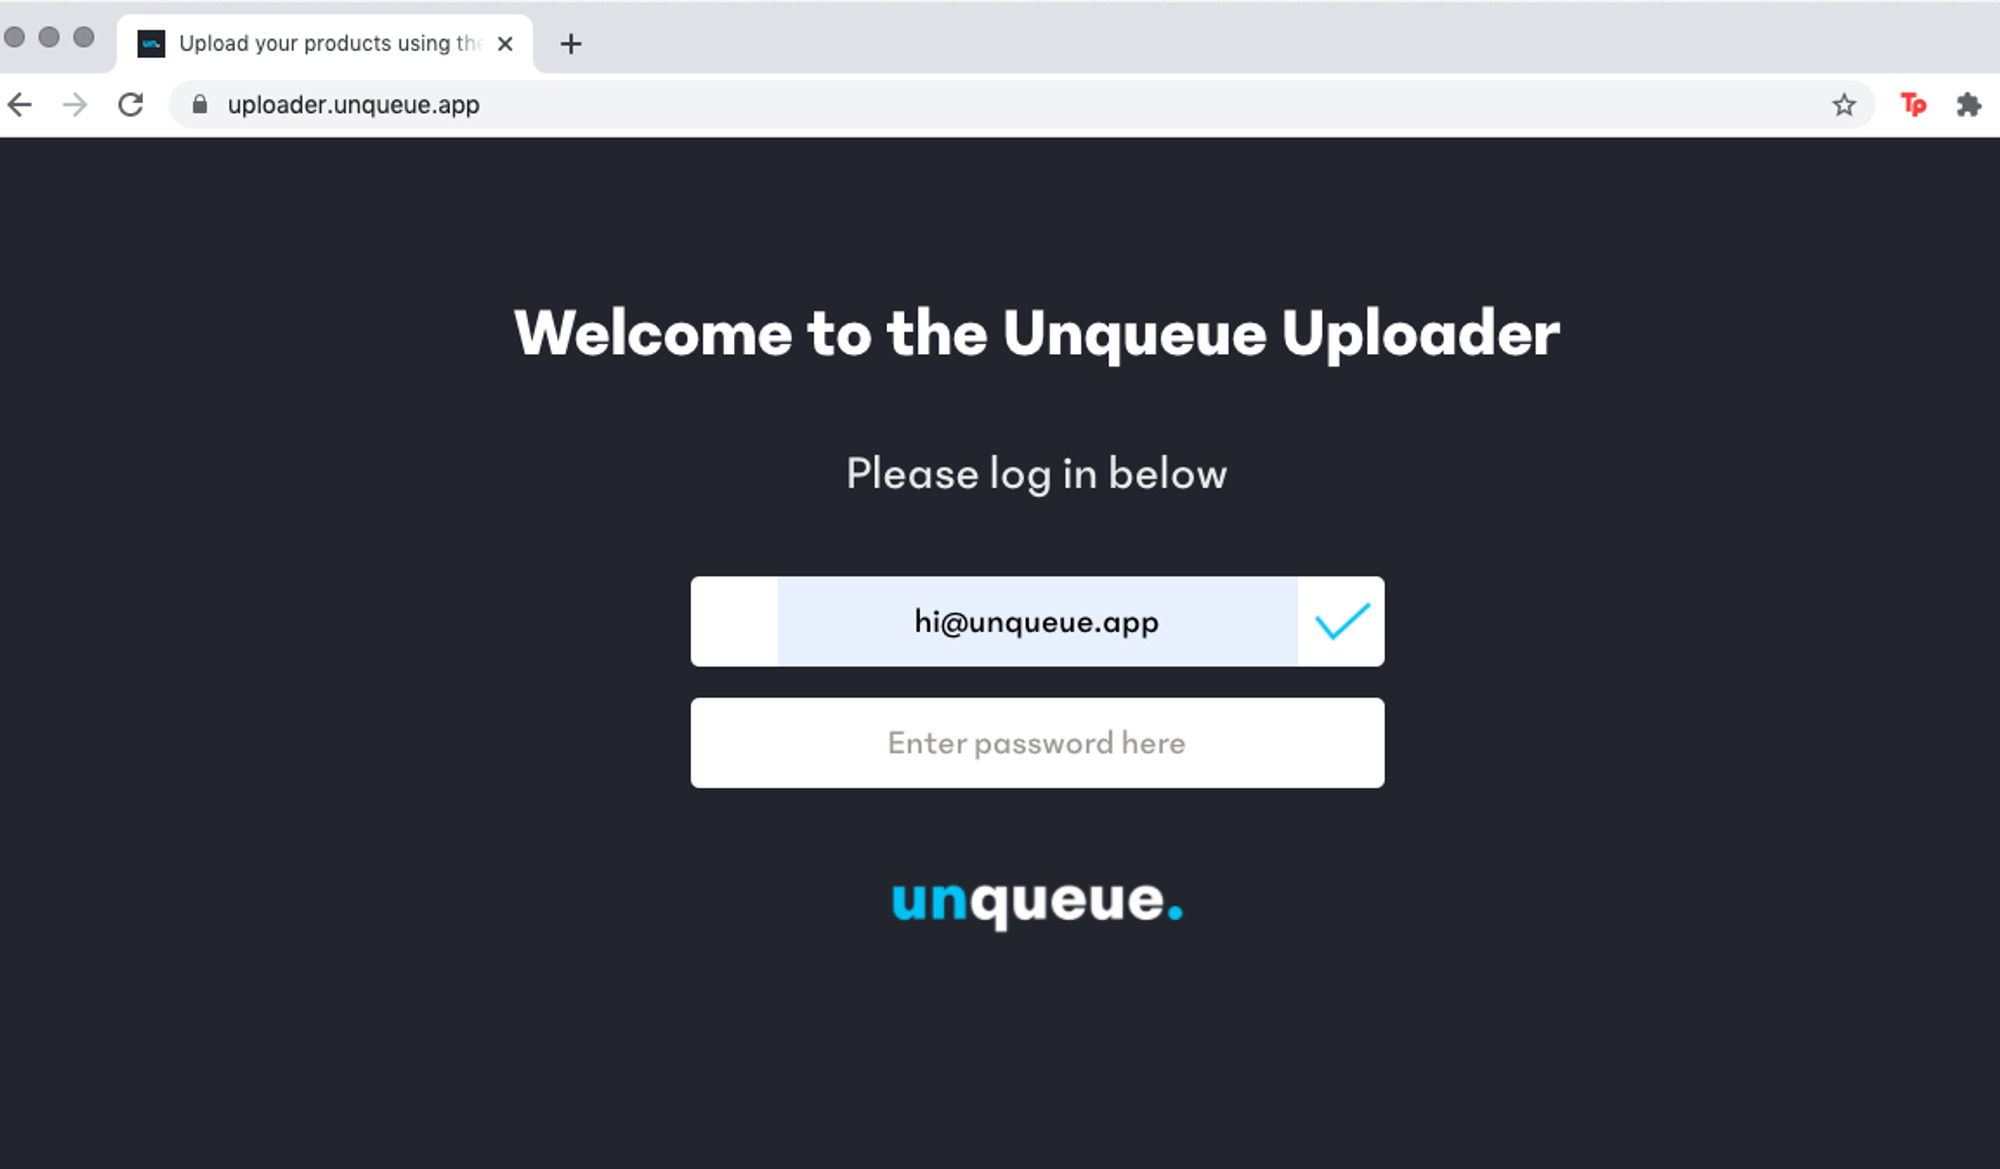
Adding products using the Unqueue Uploader If you have a lot of products, you can use the Unqueue Uploader to upload your CSV inventory for super fast setup.
First, ensure that your CSV file has the following fields filled out, with no spaces between the rows: Category Name (mandatory) Product Name (mandatory), Product Description (optional but highly recommended), Product Price (mandatory).
Once this is done, head to the Uploader website and enter the email address and password you used to create your Unqueue for Business account. Upload your file, matching the field names. The uploader will build out your store categories, products, descriptions, and prices in seconds.
Adding categories and products manually on Mobile App You can also add products one at a time, quickly and easily. Here's how:
Creating a category You must add a category before adding a product. To create a new category, tap the Store icon in the navigation bar at the bottom of your screen on the Unqueue for Business app. Once you’re there, tap the blue plus icon to the bottom right of your screen – this will open up the Create a Category window. Enter your category name, and specify the days of availability. For example, if you have a category of items that is only available on Saturday, you’d select Saturday only.
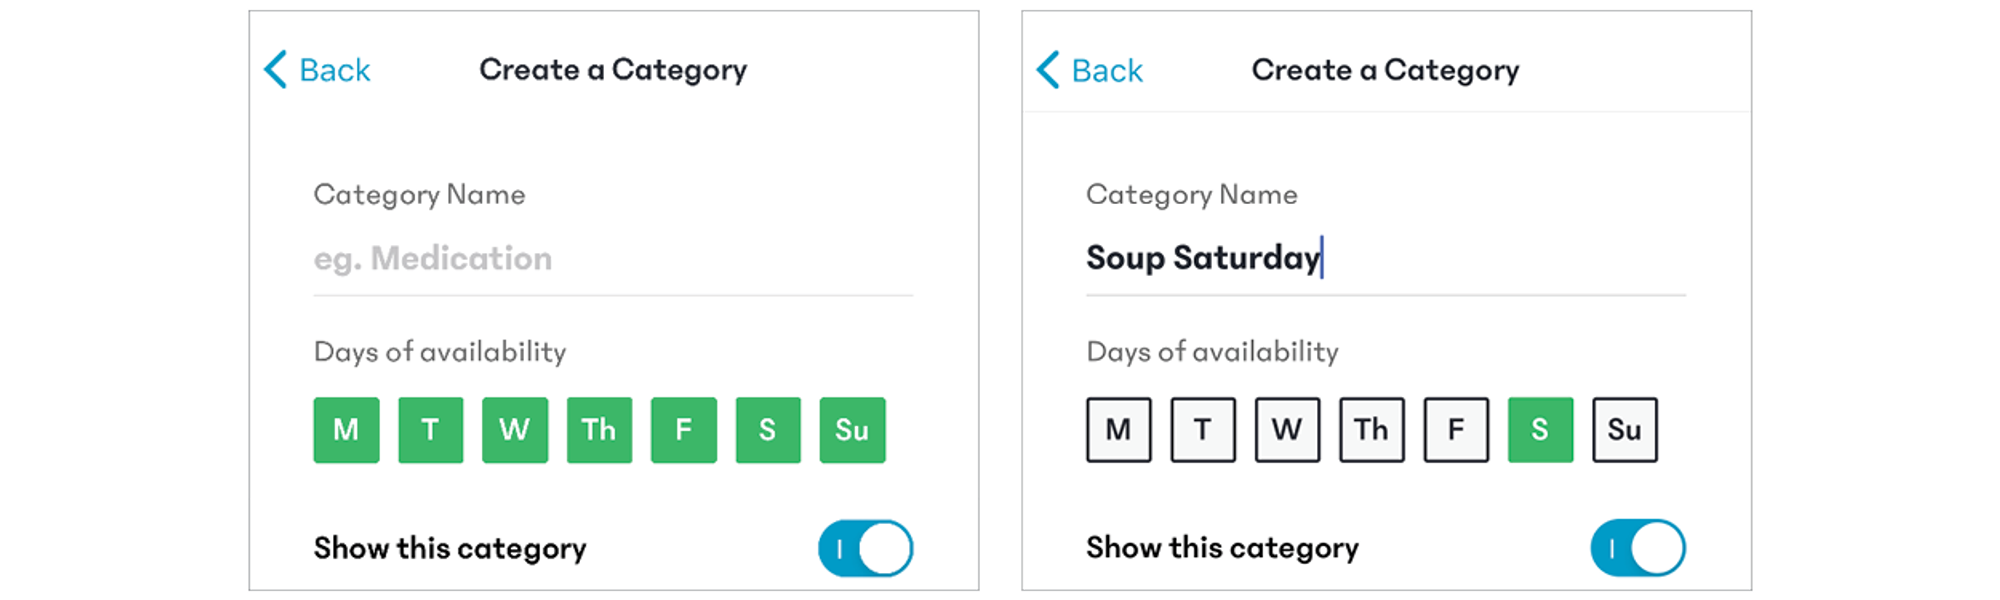
By default, the Show this category toggle is in the on/blue position, which means the category is visible to shoppers. Toggle to hide the category. With your category in place, now, it’s time to add products.
Adding categories to your store on Web
- Click Inventory on the side bar menu
- Click Add a category
- Enter Category name and days of availability
- Click Save
How to create a category on Web
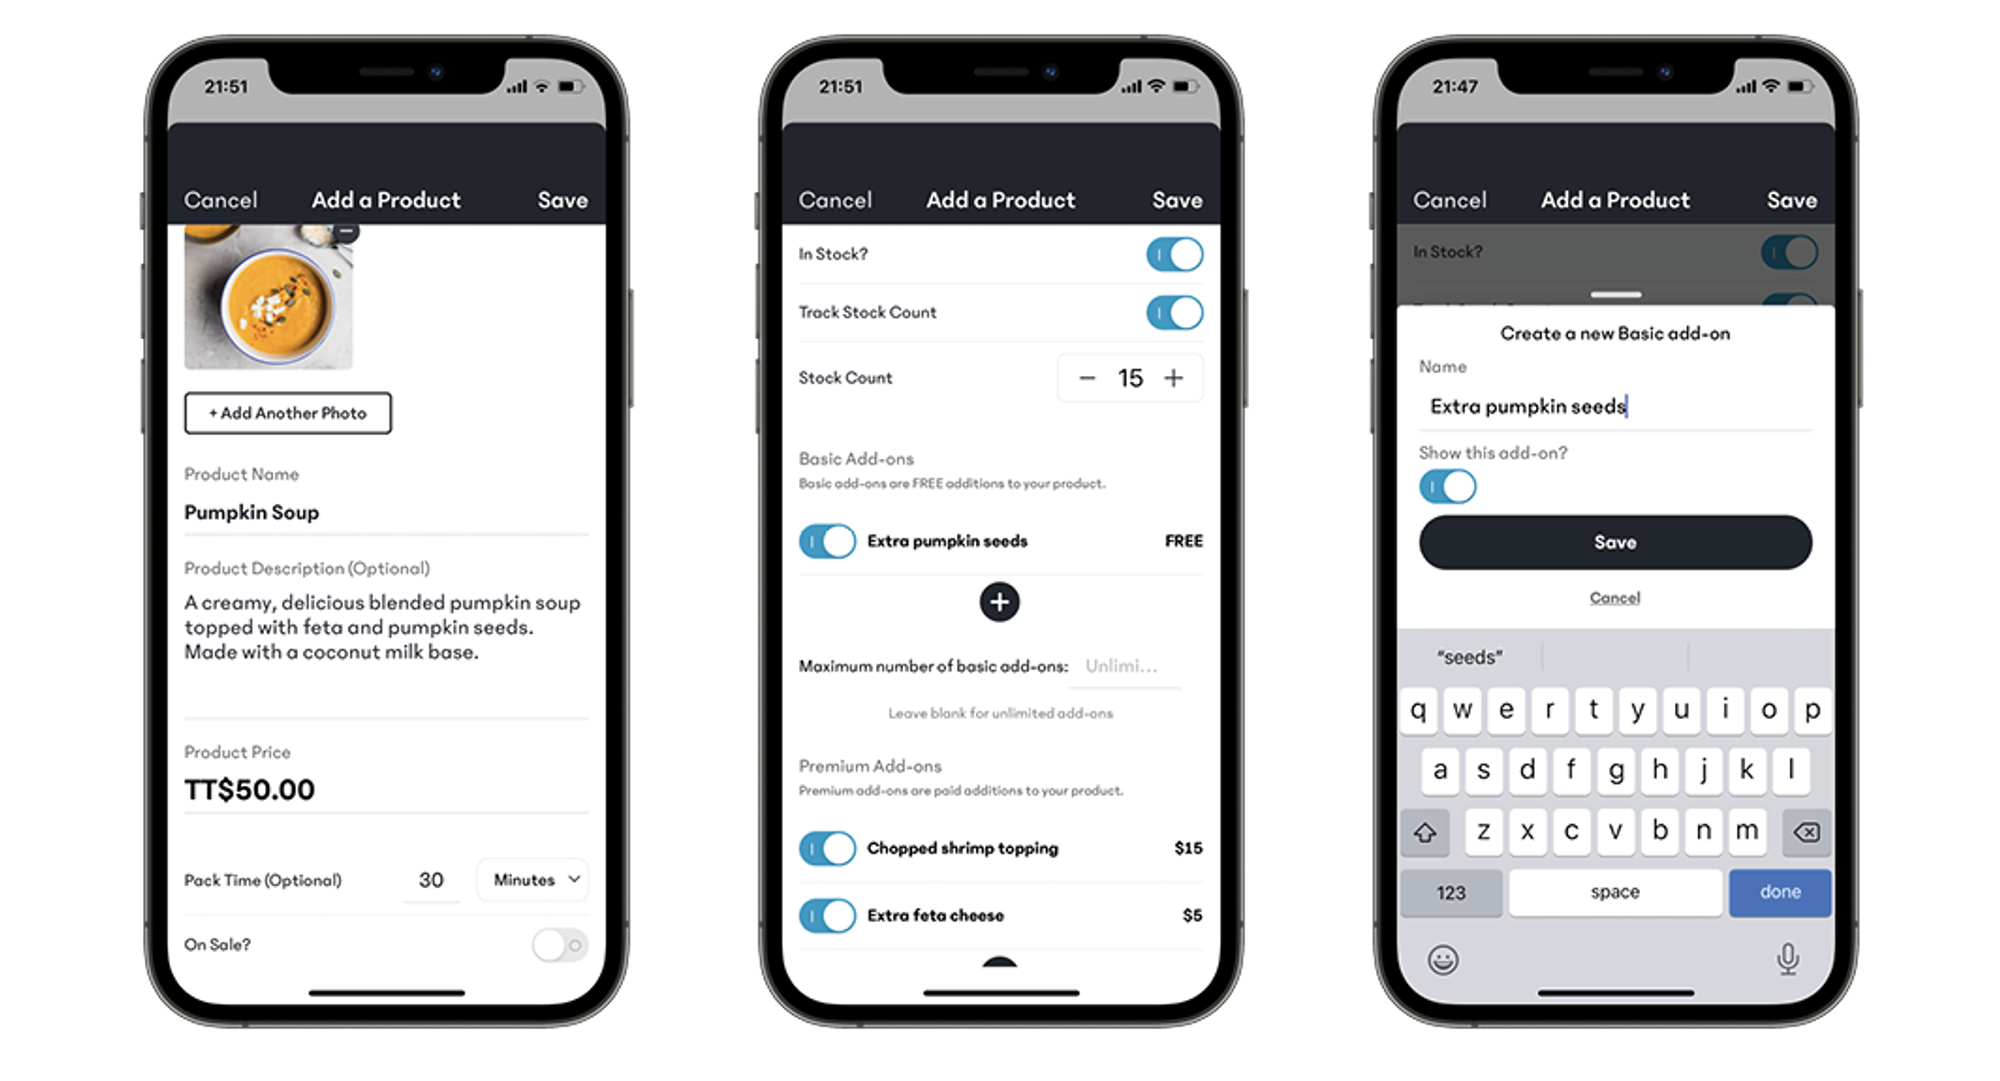
Adding a product on Mobile App Once you save a category, you will be prompted to Add a product to continue. Tap the blue plus icon, which will give you the following fields:
Adding Products on Web
- On the side bar menu select click Inventory
- Click your newly created category
- Click Add a product
- Add product photos, product name, product price, product description, pack time, in stock toggle, enter stock count, sale toggle, and Add product variations.
- Click Save
How to add a product on Web
➡️ Choose a photo (Optional)Tap to upload one or multiple photographs* of your product. Although this field is optional, it is highly recommended – over 75% of shoppers state that photographs are very influential in their decision to purchase a product online. Having great photographs to represent your products is one of the best things you can do to help drive sales. (We can help)* Note: Ideal product photo dimension is 1080 x 1080 pixels. If your images are a different proportion, they will be cropped to square.
➡️ Product Name Type your item name. Specific yet concise is the key here!
➡️ Enter a short product description Here’s where you can give shoppers a little more detail about your product. Information to consider here includes things like materials, ingredients, colours available, function or purpose.
➡️ Product Price This is the regular cost of your product. You’ll have the opportunity to add a sale price later on.
➡️ Pack Time (Optional) Pack Time tells your customers how long it takes you to prepare/pack a product. For example, if you have a specialty item that is custom and takes you three days to prepare, set your pack time to 3 Days. This information appears to your shoppers as they are placing their order, and is important in helping to manage their expectations.
Pack time also dictates the fulfillment/availability day for a particular product. For example, if a shopper orders an item with a 3-day pack time on a Monday, that Thursday will be the first option the app will give them to collect that item or have it delivered.
➡️ On Sale? To place an item on sale, tap the toggle. It will change from grey to blue. Enter the sale price and save. Your item is now on sale and will be displayed to shoppers with both the original price and the sale price in red.
➡️ In Stock? If you are out of stock, tap this toggle to turn it blue. Shoppers will not be able to see the item or order it. Toggle once it’s back in stock to make the item available again.
➡️ Track Stock Count If you have a specific number of items to sell, you can set your stock count here. Every time you sell one of these items through the app, it will be deducted from the count. Once you are at 0/out of stock, shoppers would no longer be able to order the item.
➡️ Unqueue gives businesses flexibility in setting up their stores and products. We launched our platform with Add-ons, which allowed business owners to create free or paid options for each product. But, after feedback from our stores, we realised that this feature needed to be expanded and fine-tuned. The result is Variations. Learn how to create your own variations here: How to create product variations
➡️ Share product link Tap to copy or share a direct link to this product
➡️ Remove product If you need to permanently delete an item, tap here. You will be prompted to confirm that you wish to delete the product and all its data.
With your products in place, it's time to fine-tune!
8. Fine-tuning your store on App & Web
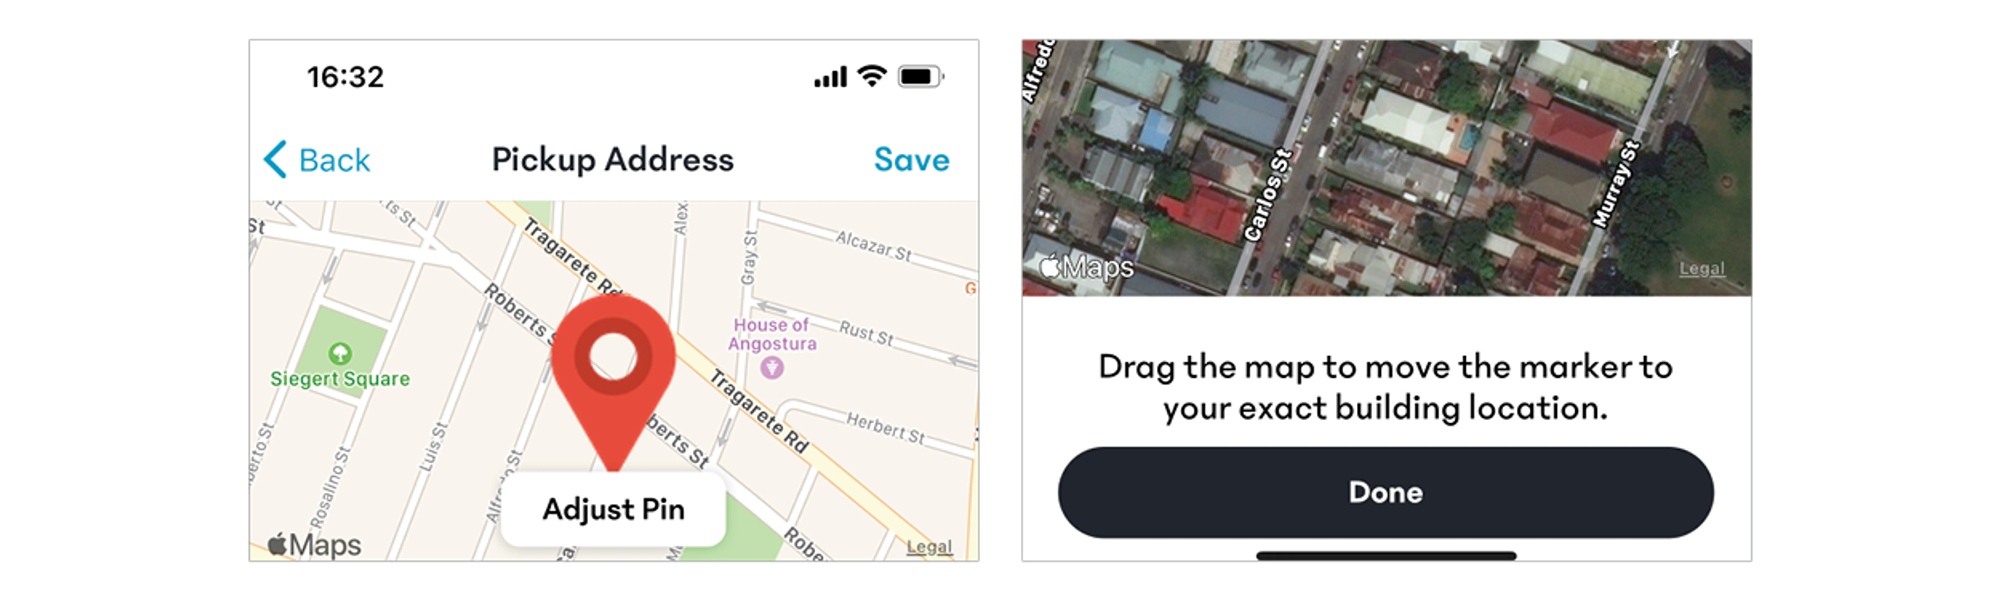
Setting your correct pin on App Here’s the thing: Google Maps isn’t so great with pinpointing exact addresses here in T&T. However, it’s important that you correctly pin your location on the map so that your shoppers and delivery drivers can easily find you – especially important if they are using their phone’s navigation software. To adjust your location, open the main menu, tap on Pickup Address, and then tap Adjust Pin. The app will prompt you to: Drag the map to move the marker to your exact building location. Tap Done once you’ve accurately pinned your location.
Setting your correct pin on Web
Here's how to correct your pin on Web:
- Go the main menu on Web Dashboard
- Select operations
- Under Pick up Address category Pin your pick up location and building number. You can adjust your pick up location depending on where you are located currently. Don't forget to adjust the pin when you change location.
- Click Save
Customise on App The Customise tab under the main menu is where you can make aesthetic edits to your store, like changing your header image and adjusting your store view from text only to images and text. It is also where you can find your store link.
We strongly recommend that you upload a photo-forward header image – this image helps shoppers understand the products you are offering. Header images are also how we determine which stores to feature on unqueue.shop.
Customise on Web
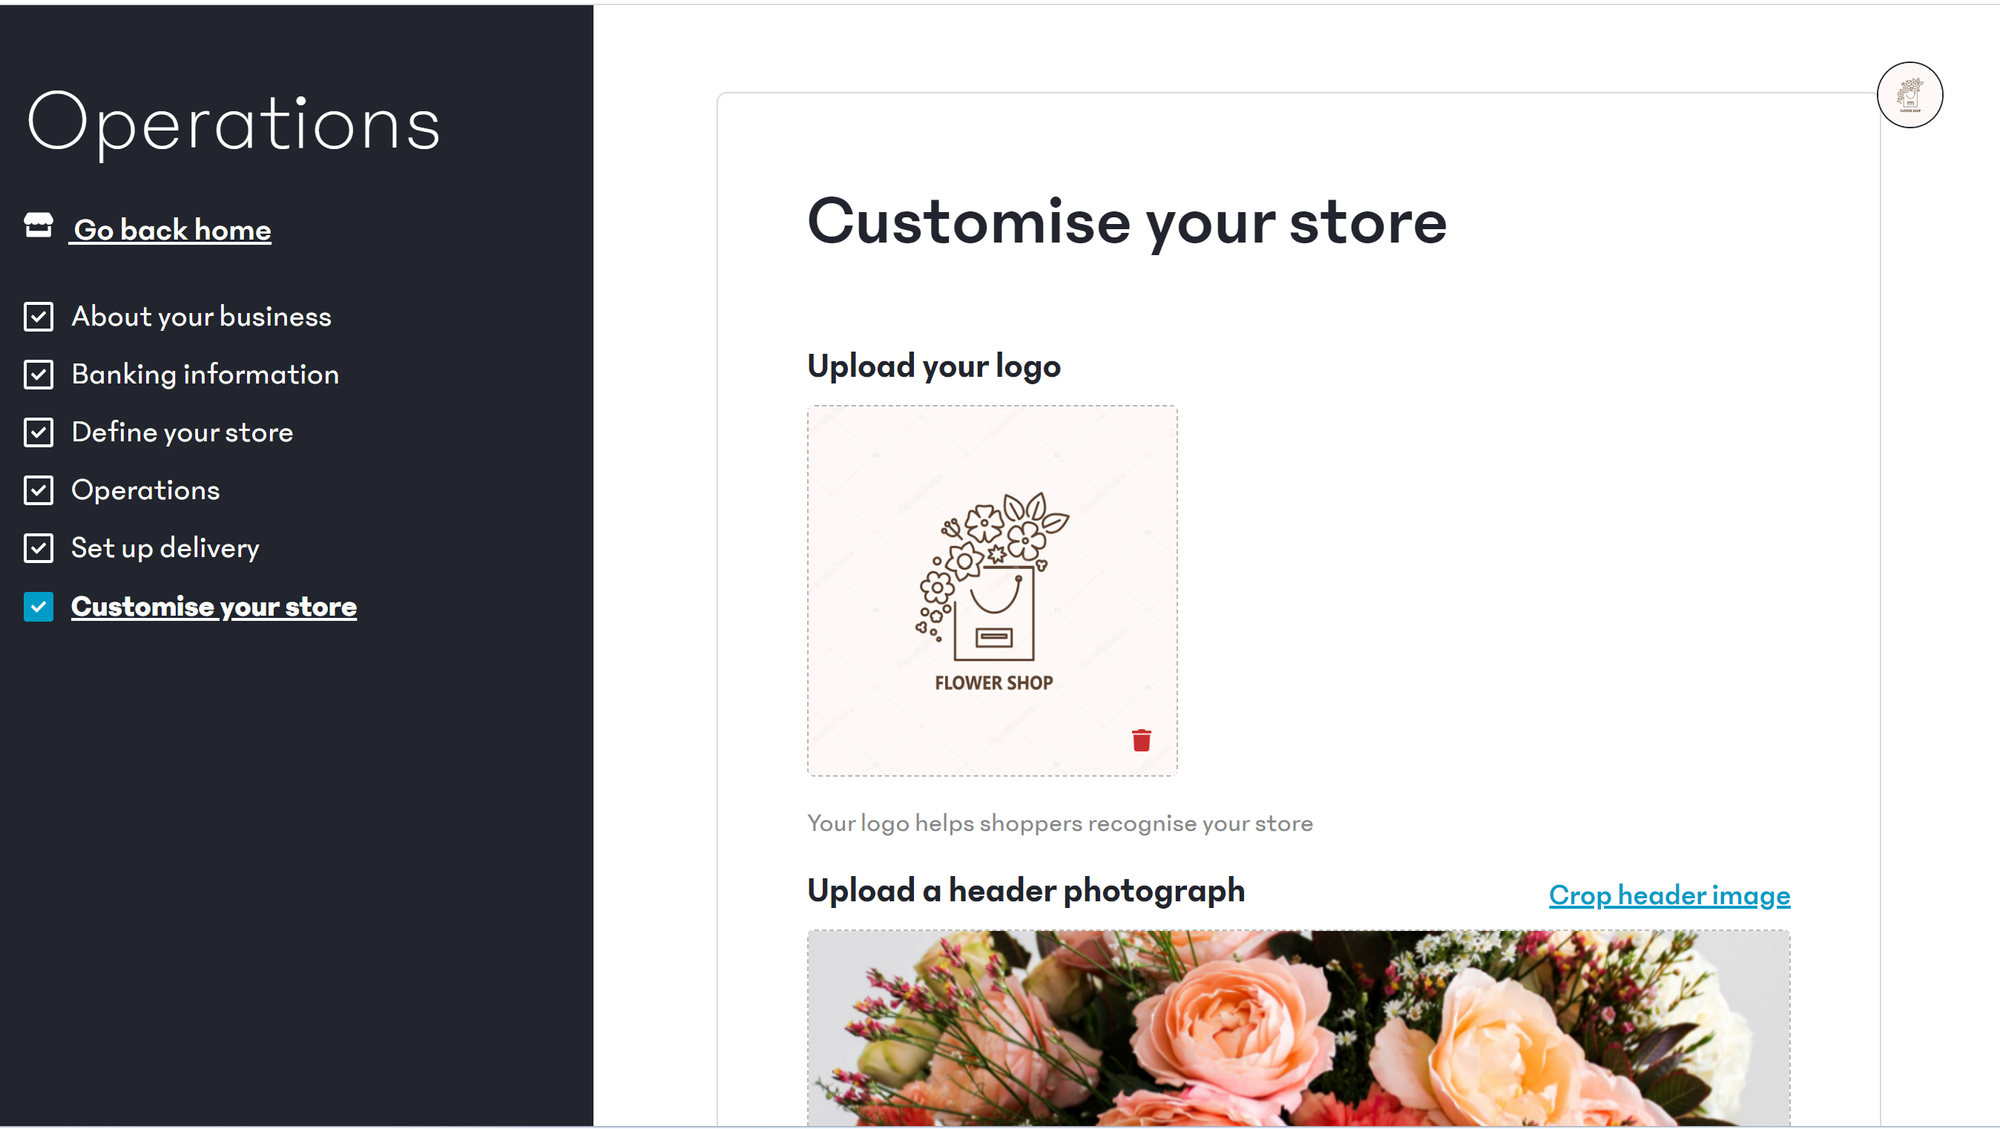
Here's how to Customise on Web:
- Go the main menu on web dashboard
- Click Customise your store
- Upload your logo and header photo
- Click Save
OK – let's switch on your store!
9. Turning on your store
Ready to launch? Great! To turn on your store, head to the main menu. The Store Visible toggle appears at the top. Tap to turn your store. You will receive a message confirming that your store is on, and that shoppers can place an order with you. Toggle again to switch off your store.
.png?table=block&id=f3774d63-3bd9-45a6-a271-ece6ee74d3ae&cache=v2)
Problems switching on? If you can’t turn on your store, there are two likely reasons that this is occurring. First, your account hasn’t been verified. Check your email for the verification link sent by Unqueue. Click to verify your account. Not seeing our verification email? Be sure to check your spam folder. Second reason: you haven’t yet completed the sign up process for Unqueue Payouts, which allows you to offer your shoppers online credit and debit card payments. Still having trouble? Use the in-app Help button to reach Unqueue Support.
Keep it current Unqueue puts selling online into the palm of your hands. This also means that you are responsible for the maintenance and upkeep of your account. Remember to keep your store current by removing items you no longer sell, or placing items out of stock. If you are going to be away for a while or otherwise unavailable to process orders, remember to switch off your store so you don’t disappoint your shoppers.
What’s next?
So, you’ve turned on your store and are ready to experience eCommerce selling bliss, but what happens next? Check out our How To Get More Orders guide to help you start promoting your store and getting those orders in.